AFLgo 环境搭建与使用
AFLgo 是一个很有意思的模糊器,但是环境的配置比较麻烦,我碰到了不少错误和问题,这里简单记录一下整个过程。官方文档
我的环境:全新 Ubuntu 16.04 虚拟机。(不过使用更新的发行版可能会减少一些麻烦的版本问题,我也有点后悔使用这个版本,不过幸好碰到的问题都可以解决)
LLVM-gold
安装 ld.gold
首先要安装支持 Gold-plugin 的 llvm 11.0.0,需要自行编译。Gold-plugin 本来是 LLVM 用于进行链接期优化的一个支持,暂时不知道在 AFLgo 中是用来做什么的,反正需要。为了编译这样一个 llvm,首先需要有支持 Gold-plugin 的 ld。检测自己的机器是否支持 Gold-plugin,只需要执行
/usr/bin/ld.gold -plugin
有 missing argument 的回显即代表支持,我的虚拟机是自带 ld.gold 的,且支持 plugin,所以就不需要手动安装了,如果没有的话需要自己编译安装,具体方法可以参考文档。
然后为了方便,可以直接把 ld 备份一下然后删掉,做一个 ld 符号链接到 ld.gold 上,这样之后就都会用 ld.gold 了。
先安装一个 clang
由于我是 Ubuntu 16.04,gcc 版本比较低,大概性能比较差,编译的时候给了 16G 内存都不够(我物理机也就这么多),所以是用 clang 编译的(自己编译自己)。如果有信心能编译过去的话也可以跳过这一步。
首先到 GitHub 上下一个你喜欢的 release 版本,我用的是 11.1.0,解压之后把 /path/to/llvm/bin/* 中的东西放到 ~/.local/bin 中,/path/to/llvm/lib/clang 文件夹放到 ~/.local/lib 中(当然你也可以放在自己想放的地方,加到 path 里面就行),然后执行 source ~/.profile,shell 里面敲 clang 不报错就说明安装好了。
编译 llvm
虽然 AFLgo 要求 llvm 11.0.0,但是我在编译该版本时出现了错误,也不知道该怎么解决,所以使用了 llvm 11.1.0,这个也可以用。
编译大约需要 10 G 内存,一定要给足
首先整个 ninja,到 GitHub 上的项目 里面挑个最新版的 release 下下来,解压之后放到一个在 path 的目录(比如 ~/.local/bin)里然后 source ~/.profile 就可以了。
然后下载源码
wget https://github.com/llvm/llvm-project/archive/refs/tags/llvmorg-11.1.0.zip
然后解压,进入文件夹,ls 时目录下应该会有 clang clang-tools-extra 这些文件夹。在此处建立 build 文件夹(据说 llvm 编译时建立的临时文件可能会污染工程结构,所以必须建立新的文件夹并在其中编译)
mkdir build
cd build
然后进行 configure,这里我没有指定 -DCMAKE_INSTALL_PREFIX=directory 这个参数,因为默认是 /usr/local,本来我就准备装这里。
CC=clang CXX=clang++ cmake -G Ninja -DLLVM_ENABLE_PROJECTS='clang;compiler-rt;clang-tools-extra;libcxx;libcxxabi' -DLLVM_BINUTILS_INCDIR=/usr/include -DCMAKE_BUILD_TYPE=Release -DLIBCXX_ENABLE_SHARED=OFF -DLIBCXX_ENABLE_STATIC_ABI_LIBRARY=ON -DLLVM_USE_LINKER=gold ../llvm
这里由于自带的 cmake 版本较低报了警告,我就自己编译安装了一个最新版的 cmake,不知道旧版的会不会造成错误,为了避免浪费时间最好还是编译安装一个最新的。
注意这里的 -DLLVM_BINUTILS_INCDIR 参数,这是指定 gold 的头文件 plugin-api.h 的位置,如果有系统自带的 gold,/usr/include 里面就有,如果是自己编译的话需要另行指定,反正保证目录里有 plugin-api.h 就行。
完事之后执行
cmake --build .
就行了。编译要很久,可以监控一下内存占用情况,如果爆内存了就得加一点(用 clang 的话占用已经比较低了)。
build 完后(build 的时候我没有碰到什么问题),就可以安装了,执行
sudo cmake --build . --target install
到这里就装好了一个可用的 llvm。
安装依赖
sudo apt-get update
sudo apt-get install python3
sudo apt-get install python3-dev
sudo apt-get install python3-pip
sudo apt-get install libboost-all-dev  # boost is not required if you use genDistance.sh in step 7
sudo apt-get install gawk
官方文档要求执行 sudo pip3 install --upgrade pip,Ubuntu 16.04 下不建议执行这一条,因为 python3 版本较低,pip3 一升级就用不了了。如果 python3 版本高的话可以执行一下。
sudo pip3 install networkx
sudo pip3 install pydot
sudo pip3 install pydotplus
编译 AFLgo
之后就跟着文档走就行了,为了文章的完整性我一并拷贝过来,下面的指令一条条执行下去即可。
# Checkout source code
git clone https://github.com/aflgo/aflgo.git
export AFLGO=$PWD/aflgo

# Compile source code
pushd $AFLGO
make clean all
cd llvm_mode
make clean all
cd ..
cd distance_calculator/
cmake -G Ninja ./
cmake --build ./
popd
到此位置如果没碰到什么错误的话(至少我没碰到),AFLgo 就装好了。
fuzz libxml2
编译
这是文档中给出的一个示例,可以学到如何使用 AFLgo。
首先下载源码
# Clone subject repository
git clone https://gitlab.gnome.org/GNOME/libxml2
export SUBJECT=$PWD/libxml2
然后回退版本,获取 patch,并分析 patch 文件。
# Setup directory containing all temporary files
mkdir temp
export TMP_DIR=$PWD/temp

# Download commit-analysis tool
wget https://raw.githubusercontent.com/jay/showlinenum/develop/showlinenum.awk
chmod +x showlinenum.awk
mv showlinenum.awk $TMP_DIR

# Generate BBtargets from commit ef709ce2
pushd $SUBJECT
  git checkout ef709ce2
  git diff -U0 HEAD^ HEAD > $TMP_DIR/commit.diff
popd
cat $TMP_DIR/commit.diff |  $TMP_DIR/showlinenum.awk show_header=0 path=1 | grep -e "\.[ch]:[0-9]*:+" -e "\.cpp:[0-9]*:+" -e "\.cc:[0-9]*:+" | cut -d+ -f1 | rev | cut -c2- | rev > $TMP_DIR/BBtargets.txt

# Print extracted targets.
echo "Targets:"
cat $TMP_DIR/BBtargets.txt
然后在编译前注意这一个提示
# * If the linker (CCLD) complains that you should run ranlib, make
#   sure that libLTO.so and LLVMgold.so (from building LLVM with Gold)
#   can be found in /usr/lib/bfd-plugins
也就是要在 /usr/lib/bfd-plugins 中有 libLTO.so LLVMgold.so。我手动拷贝了一下,不然链接时可能会因为找不到符号表报一大堆错。
然后进行第一次编译
# Set aflgo-instrumenter
export CC=$AFLGO/afl-clang-fast
export CXX=$AFLGO/afl-clang-fast++

# Set aflgo-instrumentation flags
export COPY_CFLAGS=$CFLAGS
export COPY_CXXFLAGS=$CXXFLAGS
export ADDITIONAL="-targets=$TMP_DIR/BBtargets.txt -outdir=$TMP_DIR -flto -fuse-ld=gold -Wl,-plugin-opt=save-temps"
export CFLAGS="$CFLAGS $ADDITIONAL"
export CXXFLAGS="$CXXFLAGS $ADDITIONAL"

# Build libxml2 (in order to generate CG and CFGs).
# Meanwhile go have a coffee ☕️
export LDFLAGS=-lpthread
pushd $SUBJECT
  ./autogen.sh
  ./configure --disable-shared
  make clean
  make xmllint
popd
编译之后进行测试
# Test whether CG/CFG extraction was successful
$SUBJECT/xmllint --valid --recover $SUBJECT/test/dtd3
ls $TMP_DIR/dot-files
echo "Function targets"
cat $TMP_DIR/Ftargets.txt

# Clean up
cat $TMP_DIR/BBnames.txt | rev | cut -d: -f2- | rev | sort | uniq > $TMP_DIR/BBnames2.txt && mv $TMP_DIR/BBnames2.txt $TMP_DIR/BBnames.txt
cat $TMP_DIR/BBcalls.txt | sort | uniq > $TMP_DIR/BBcalls2.txt && mv $TMP_DIR/BBcalls2.txt $TMP_DIR/BBcalls.txt
没有问题的话就可以生成距离表了,即执行
$AFLGO/scripts/gen_distance_fast.py $SUBJECT $TMP_DIR xmllint
不过可能是因为我的 python 版本太低,跑这个会报错,我也不知道该怎么改,所以就用了他的老脚本,即执行
$AFLGO/scripts/genDistance.sh $SUBJECT $TMP_DIR xmllint
这个确实很慢,也要等好一会儿。
然后检查一下是否输出了距离表
# Check distance file
head -n5 $TMP_DIR/distance.cfg.txt
tail -n5 $TMP_DIR/distance.cfg.txt
如果 distance.cfg.txt 是空的话,就代表计算时有错误,不过我没碰到,所以也不知道该怎么解决。
最后编译目标
export CFLAGS="$COPY_CFLAGS -distance=$TMP_DIR/distance.cfg.txt"
export CXXFLAGS="$COPY_CXXFLAGS -distance=$TMP_DIR/distance.cfg.txt"

# Clean and build subject with distance instrumentation ☕️
pushd $SUBJECT
  make clean
  ./configure --disable-shared
  make xmllint
popd
这里编译时出错了的话可以参考 issue,不过我没碰到什么问题。
fuzz!
首先建立输入文件夹
# Construct seed corpus
mkdir in
cp $SUBJECT/test/dtd* in
cp $SUBJECT/test/dtds/* in
然后执行
$AFLGO/afl-fuzz -S ef709ce2 -z exp -c 45m -i in -o out $SUBJECT/xmllint --valid --recover @@
即可开始 fuzz。不过令人沮丧的是开局报了个错
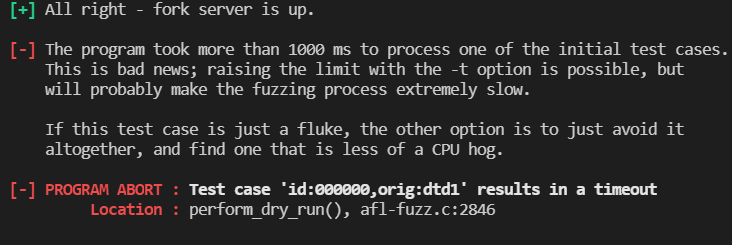
大概就是被测目标在执行一个提供的种子时跑的非常慢(超过了 1s),建议别测了。我自己跑了一下发现确实很慢,但是不可能真的不测了,所以我就把 in/dtd1 删掉了。然后就可以开始 roll 了。
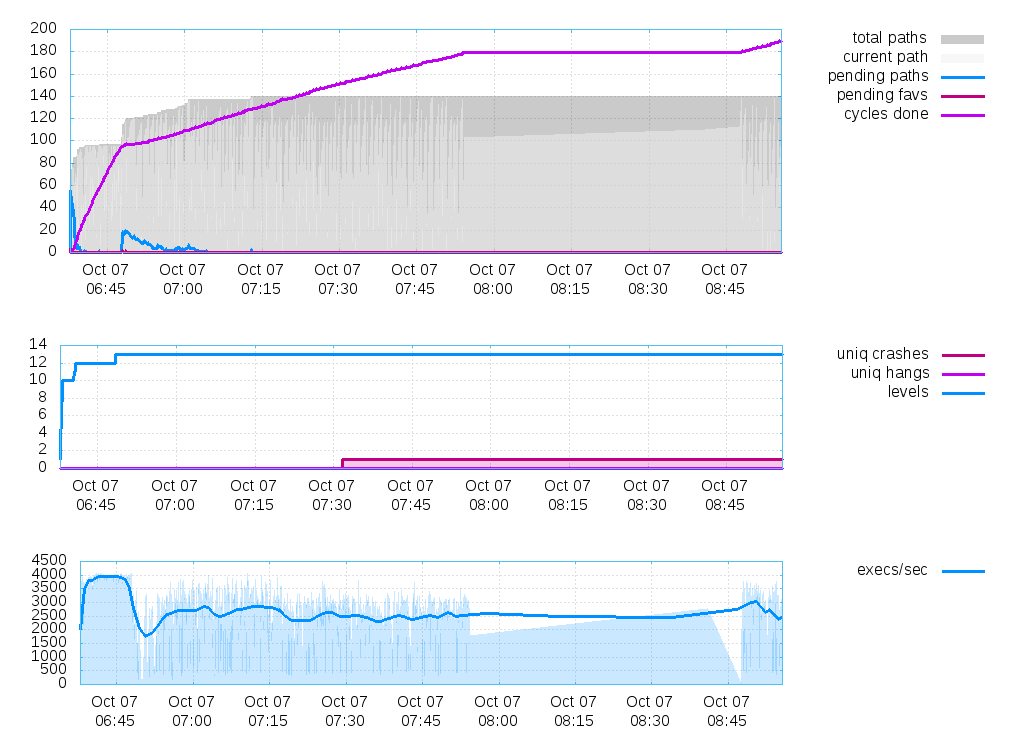
最后使用一个 cpu 进行了 74 分钟的测试,跑出了 72 个 unique crash,可谓效率极高。
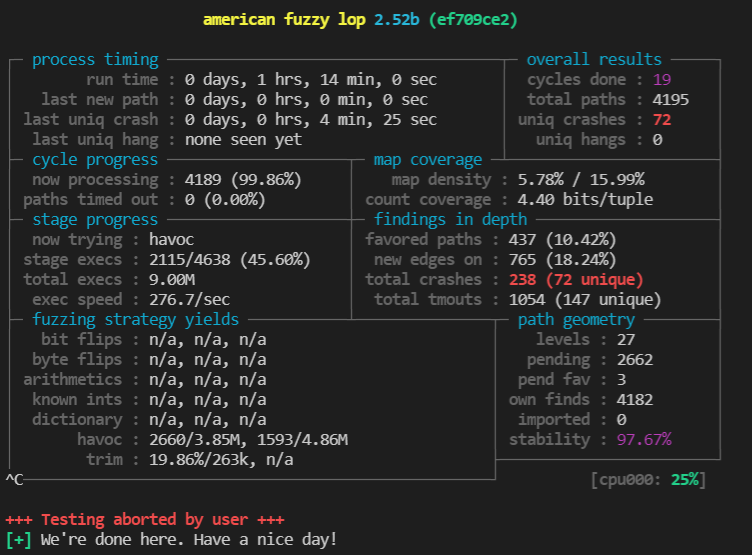
而且大多数的 crash 都是一开始就跑出来了的,可以说是非常快了。
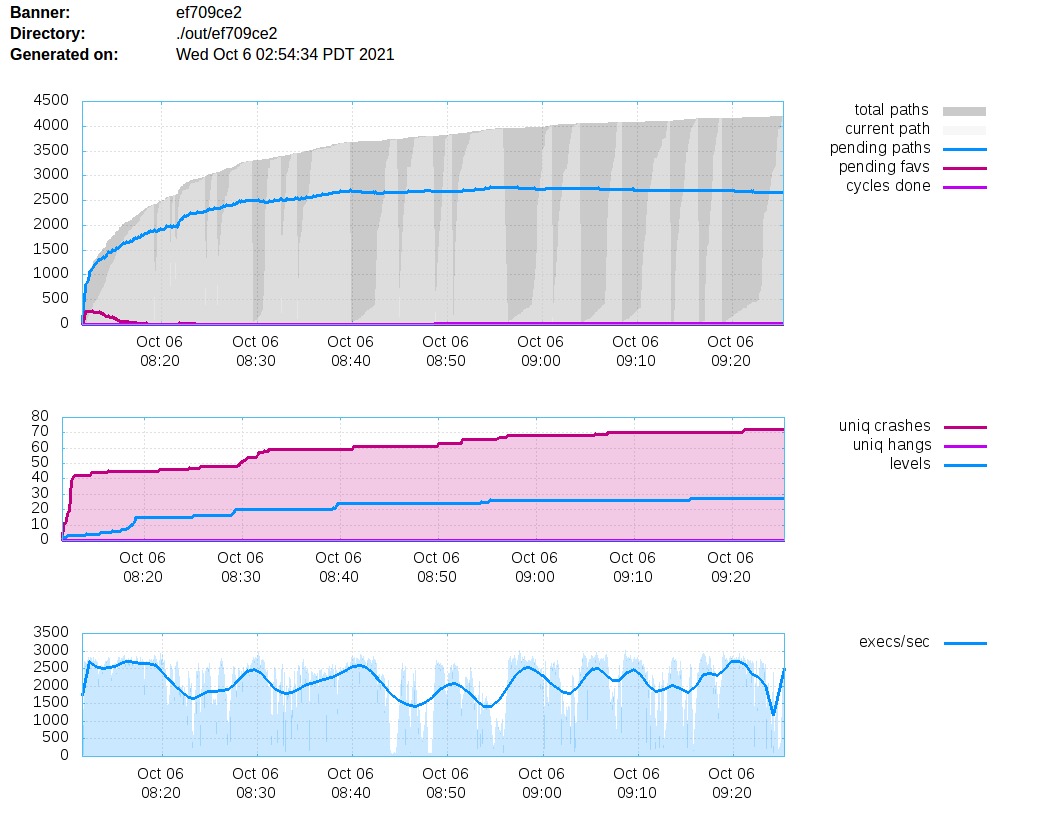
对 Lava-M/base64 的测试
我尝试进行了一次两个小时的测试,只出了一个 unique crash,猜测是没有正确提供导向信息,之后准备再看看该怎么解决。